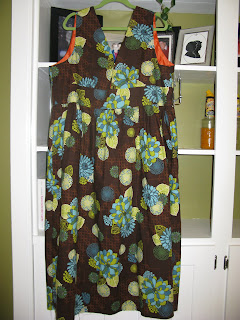
I know, bad blogger, bad blogger! But hey- I was out of town until Wednesday and I'm going out of town tomorrow, so give me a break. I've been doing laundry, re-acquainting myself with my own home, and of course sewing! Last time I posted I told you about a couple of projects I was working on, and I have pictures!! I sewed the side seams up on the dress, taking out the slipstitch I'd started (per good advice) so that I could sew the fabric and lining in one continuous seam, that way I won't have any raw seams in the bodice. So, as promised, here are some pictures of the dress. I LOVE, LOVE, LOVE the fabric- I got it at this crazy little quilting store in town, they have some truly amazing stuff! Here is a shot of the dress from the front- it doesn't look like much on the hanger, but it is cute on.
 And a close up of the bodice and the funky orange I used to line it (orange was on clearance, plus I like the retro vibe it gives):
 And finally a good shot if the print; I love the zinnias and all the colors! This is part of Robert Kaufman's "Hot Blossoms" collection.
 And finally, the shirt I was working on. Now, I know I said that I was making this in a really pretty blue t-shirt jersey, and I was (or am...) but I hit kind of a road block. After putting together the top, hemming around the neck and arms (NOT EASY with this jersey!!), and putting the bottom pieces together I had finally worked up the courage to pin the top to the bottom and get the thing sewn already. My mother-in-law had suggested using a straight stitch in some places, but keeping with the stretch stitch in others, which I thought was a good idea. So I set to work sewing the empire waist with a stretch stitch and perfectly matching thread (yay!), it was only when I had finished that I noticed that I hadn't pinned the right sides together! My finished project had the bottom inside out *#$$@!*&^$%#%! Ugh, so I've been working on picking out the almost invisible stretch seam. In the mean time, I had picked up this pretty yellow seersucker on clearance and thought it would make a great summer-y top! Since I had the pattern pieces cut out already, and knew how the top would go together, I was able to make this in just a few hours. And viola!!! My first finished garment for myself :)
And here is a picture of me wearing it:
 I did make a few changes; I added about 1 1/2 inches to the length of the front pieces to accommodate for a larger bust, then since the front was longer I added a pleat along the side seam so that they would match up on the side seam. Finally I closed up the front a bit (the original shows it open to the waist) so that my bra wouldn't be hanging out. All in all I really like this top, and I think next time I'll make it out of some cute chiffon that I picked up on clearance!
Oh, and since I've been a bad blogger I forgot to note that I lost another 2 lbs this week, brining my total loss up to 13.2 lbs!

No comments:
Post a Comment